Dreamwalker is a first person action adventure game, set in the world of dreams. I was attracted to this project because the opportunity to build worlds that don’t fully adhere to the laws of reality. In most of my previous projects my primary goal has been learning and improving my technical skills, while the goal of this project is to bring all those skills together and deliver a polished full length game. Scope management has been a primary consideration for this project, but I have also been equally focused on building something that will stand out both in gameplay and aesthetics.
Top Technical Contributions
- Smooth and intuitive character movement, expanded the built-in movement handling including climbing, ledge grabs, sliding, and swimming.
- Procedural Generation Tools for rapid and non-destructive worldbuilding using PCG
- Data driven Spore Effect Framework which provides a simple yet elegant way to build and apply temporary special effects to the player (or other actors).
- Iterated and developed intutive and flexible designer tools to streamline development and produce fun and exciting gameplay
- Rapidly Prototyped new mechanics and visual effects
- Full controller support for all UIs using the Common UI plugin and integrated and customized a data driven dialogue system
- Teaching and onboarding designers and artists in Unreal Engine and the tools and workflows specific to the project.
Procedural Tools Using PCG
Early in the project, when the game was still planned as a simple exploration driven walking simulator, I wanted to really make the world stand out in its size and scope. Even though the team did not want this to be a procedural game, I believed that we could still utilize procedural generation to fill the world with detail, without the need to place everything by hand. Several months prior, I Unreal 5.2 released a new plugin called PCG (Procedural Content Generation), so I decided to look into this as a possible solution.
First Two Weeks with PCG
I had to learn the basiscs about how to use PCG quickly, while also implementing the paper desert. The team had decided to allocate 2 weeks to develop this world. One important point I learend was that I could query the scene for hand placed actors, which could then be used to drive elements of the procgen. This allowed me to setup a actor class BP_Exclusion_Area which allowed us to designate areas to be excluded in the desert generation, such as the village. It would be bad to have giant bolders generated in the NPCs huts. I also created the BP_Pathway spline actor which was used to generate stone pathways along splines, which ended up being critical to player navigation within the large open world desert.
Procedural Mushroom Forest
After the desert, I challenged myself to take this new knowledge and generate a much more complex enviornment, the mushroom forest. This mushroom forest is one of my favorite personal achievements on this project. To limit the scope of this task and the build size, I gave myself the limitations of not using any trees and instead relied on giant mushrooms to fill out the bulk of the forest. I approached this challenge by studying the PCG sample project (Electric Dreams). I attempted to translate the techniques used to create that environment to the one I was trying to create.
Spawning PCG Data Assets
There were a number of key things I learned during this, but one of the things that was most valuable was the concept of using level instances as point cloud inputs. So rather than spawning individual static meshes, I was now able to create meaningful collections of meshes that could be given logical tags. For example, I was able to make a giant mushrooms covered in vine growth and then in the graph I could spawn the base mushroom 100% of the time, while the vines could be spawned less at a less frequent rate.
Spawning Actors
I noticed that PCG had a spawn actor node, which I figured out would allow me to use PCG to spawn anything, not just static meshes. With this feature, I was able to work with the audio engineer so that the forest would generate audio for the rivers and lakes, which the graph was already had been using to exclude forest generation.
PCG Designer/Artist Tools
I realized through making this forest scene that I could use PCG to build designer tools, that produced closer to final quality visuals using basic controls like splines and exposed blueprint properties. The addition of the procedural hole actor provided a sculpting mechanism, essentially allowing designers to subtract bricks from PCG temple. I added this for the purpose of adding doors, but discovered it has many more uses as well. I also added code in the floor that accounts for holes, which can be set to actually cut holes or to force specific sections to spawn as dirt or bricks.
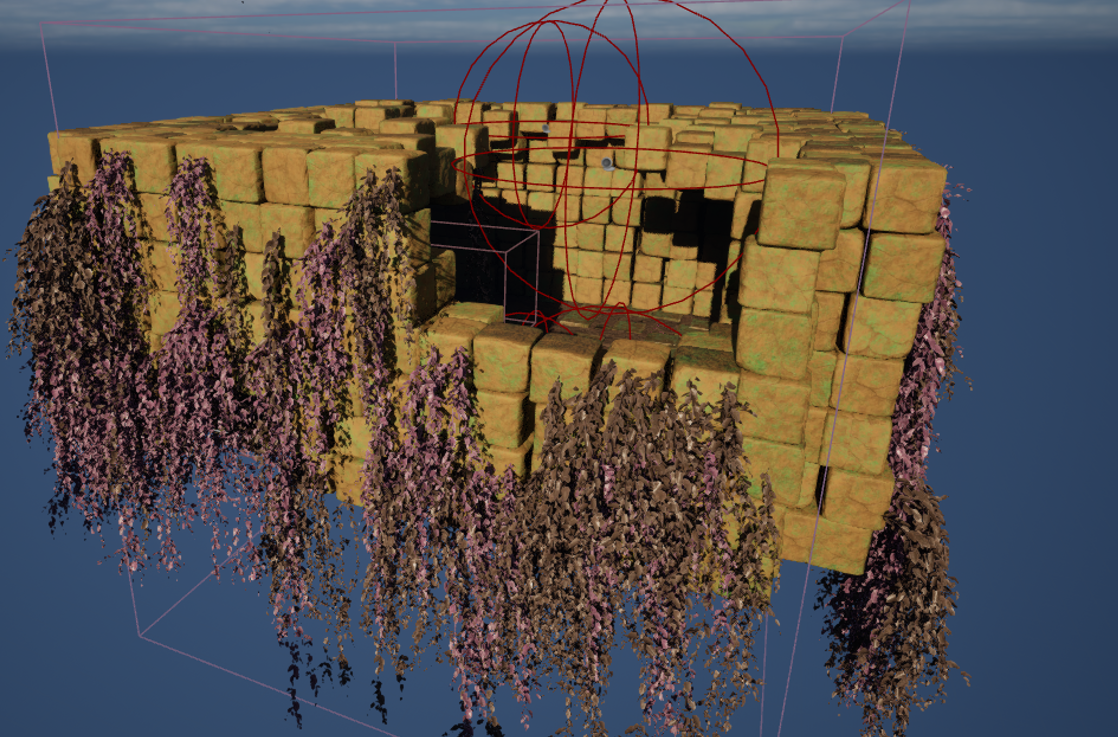
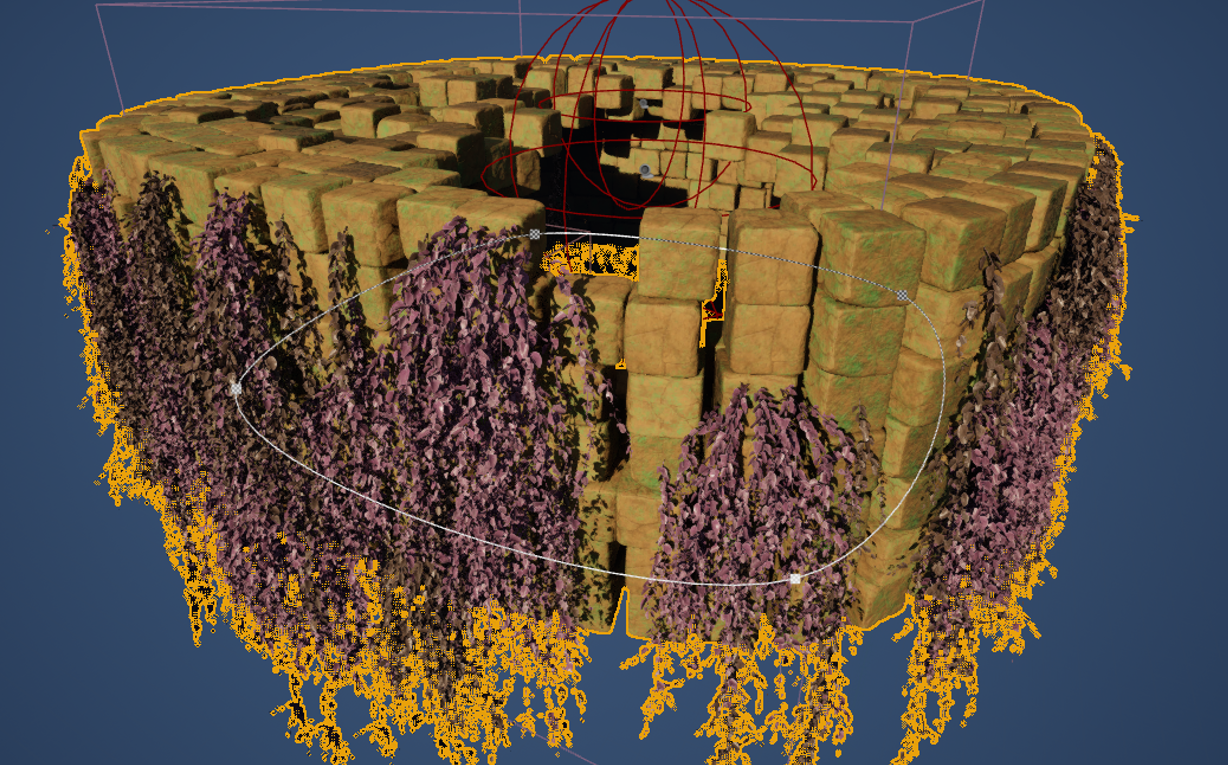
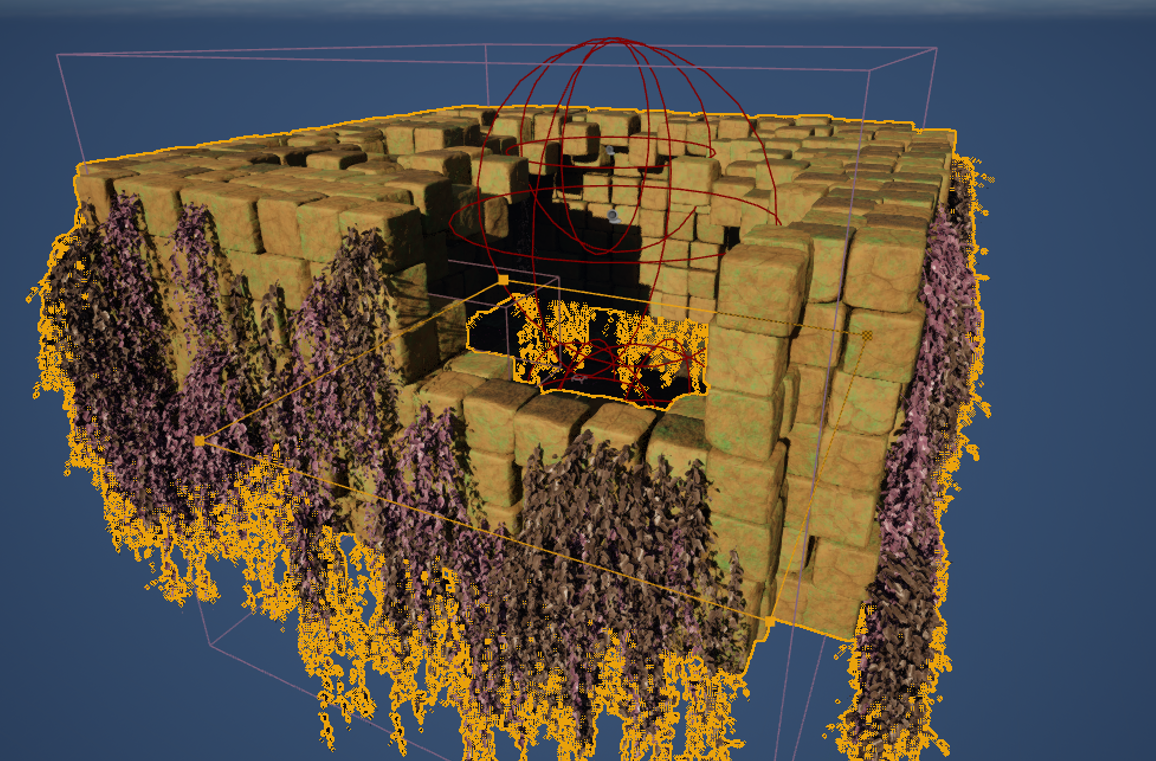
PCG Tools Feature Highlights
- Procedural Temple Wall (Spline & Grid Versions)
- Randomness controls to achieve different styles
- Designers can use procedural hole actor to cut holes in the wall
- Optionally spawn vines on the outside of the wall
- Optionally spawn a roof (spline version only)
- Procedural Temple Floor
- Randomness controls to achieve different styles and moods
- Controls for spawning dirt and mushroom detailing
- Optionally snap to landscape
- Optionally use bricks at edge
- Procedural Plank Walkway (Spline)
- Uses a separate mesh for collisions, ensuring smooth collisions, even if the planks look bumpy and uneven. Collisions are hidden in game and can be oversized to make certain objects more forgiving for gameplay than they physically appear
Expanded Character Movement
Originally the game was meant to be a walking simulator, but as it matured into an adventure 3D platformer so did the player’s movement capabilities. Early on I added sprinting and crouching, and then later added the ledge grab, climbing, and swimming. Of these, I am most proud of the ledge grab, as it has the most impact on gameplay. I built both underwater full freedom swimming and surface only swimming, but the level designer wanted to only use the surface swimming mode.
Animations and Head Bobbing
Once I added animations, I realized that I could achieve a more compelling player experience by having the camera follow the character’s head movements. This worked well, except some players found this motion uncomfortable. To make this feature optional, I gave the camera two possible targets. One was fixed to the skeletal mesh’s head, the other was not. Then I could choose which to use based on whether that setting was enabled or not.
Ledge Grab and Ledge Climb
This was a feature that I implemented myself first. I did also check out some other implementations online as well, but I ended up mostly using my own version. This feature was one of the more complex mechanics that I built for Dreamwalker.
I always strive to minimize the number of level designer steps, so automatically the grab will work on any valid collision surface. However, I did add the "No Grab" tag which can be added to either an actor or a specific component and it will prevent ledge grabbing on those objects.
Getting the climbing to feel just right took a few iterations. Eventually, adding animation combined with scripted movement allowed for the grab to feel intense, but also fully response.
Grabbing dynamic platforms was slightly trickier. I tried a few techniques to accomplish this, but the most successful was to attach dummy actors to the grabbed components. This allowed the grab to react to any kind of platform transformation. Some objects are not grabbable, or have states where a grab is not valid, so to I used the "No Grab" tag to indicate platforms that could not be grabbed. If this tag is added during a ledge grab or ledge climb, the grab will be terminated.
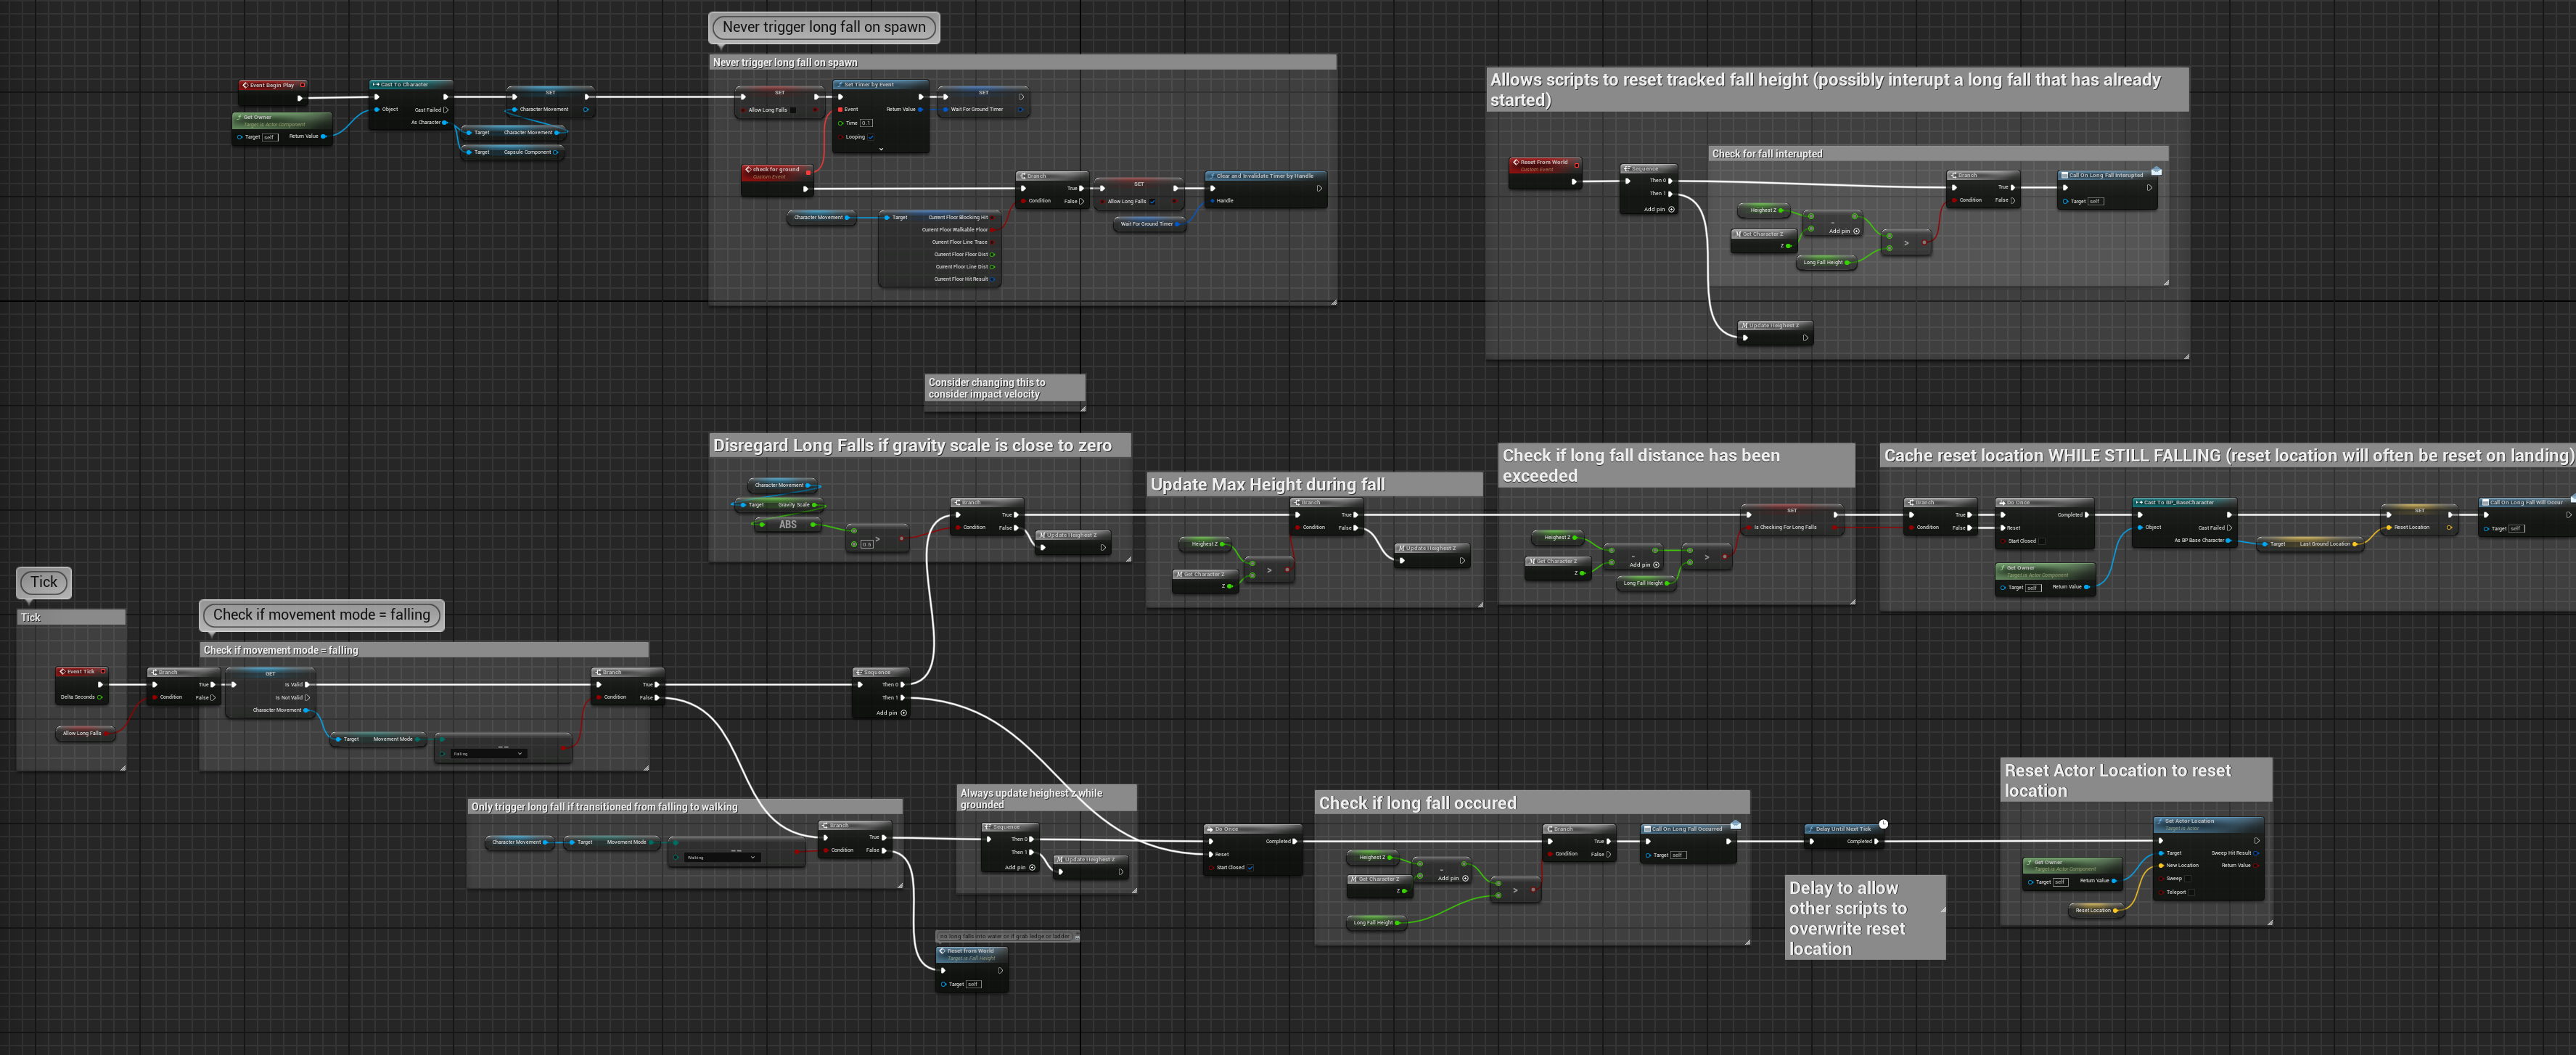
Player Position Resets & Fall Height
I recently added a long fall system into the game which triggers a player reset if the player falls from a tall enough height. A nice feature about this system is the way it determines where to reset the player. The reset position system works by tracking the player’s current location on the ground and recording the last valid ground location. Actor tags are used to mark certain platforms as “No Save”, meaning the reset system will not count that platform as a valid reset. This allows designers to the force player to complete challenges without making a mistake, and will ensure they are sent back to the start if the player triggers a reset. This system also doubles as the player reload position used by the save/load system. All dynamic platform blueprints are already marked with the “No Save” tag, meaning that little or no designer setup is needed to create a particular challenge.
Fall Height System
The fall height system works by tracking the player’s z position in the air (relative to the direction of gravity). Tracking the heighest point of the fall, the system can then determine how long the fall is in terms of height. To compensate for any dynamic elements such as low gravity or a bounce mushroom, the system sets the heighest point of the fall to the player’s current position.
Save-Load System
Compared to some of my other projects, namely Steam Eagles, the amount of information required for save/load is relatively small. However, it is not-negligable. As an adventure game with a story driven progression system, there are many elements in the world which change as a reaction to events in the story. We need to load the player back to their exact stage in the story, so everything in the world is in the correct state. A few objects are tracked explicitly in the savegame class, such as the player, all NPCs, and certain interactables like levers. The rest of the game was saved as world events.
World Event System
The World Events system saves everything implicitly by way of a unique world event, which is simply a name. The World Events system acts as both a global message bus, but also as a persistence mechanism. The WorldEventListener interface exposes a useful API for implementing any actor that needs to react to a specific world event.
class PATCHWORK_API IWorldEventListener
{
    GENERATED_BODY()
public:
    //Called when the event occurs in the world during gameplay. Use to trigger cinematics, animations, and gradual state change.
    UFUNCTION(BlueprintCallable, BlueprintNativeEvent, Category="World Events")
    void OnWorldEventOccured(FName worldEvent);

    //Called when the game loads to a point after the event has already occured. Use to set the state directly to it's end point without playing animations
    UFUNCTION(BlueprintCallable, BlueprintNativeEvent, Category="World Events")
    void OnWorldEventLoaded(FName worldEvent);

    //defines the set of world events which this class is concerned with.
    //If left empty the listener will recieve all world events, otherwise it will only receive callbacks for the world events specified in the array
    UFUNCTION(BlueprintCallable, BlueprintNativeEvent, Category="World Events")
    TArray<FName> GetRelaventEvents();
}
Note: This project uses Blueprints, but I’m using C++ here for space and readability.
Unlocking Abilities
The mushroom bounce ability is the only currently implemented ability, but there are two more planned. It isn’t a huge number of abilities to accomidate, so I didn’t want to overcomplicate it. The abilities become unlocked after certain player milestones. I implemented an ability_base as an actor component so they could be activated by the player by listening for a specific world event (i.e. “Ability 1 Unlocked”).
Bounce Mushroom Ability
The mushroom will stick to any surface except those marked with the “No Mush” tag
Data-Driven Gameplay Effect System
The system provides a single access point through a data table for each effect’s behavior, timing, visuals, and post-processing (player only visuals).
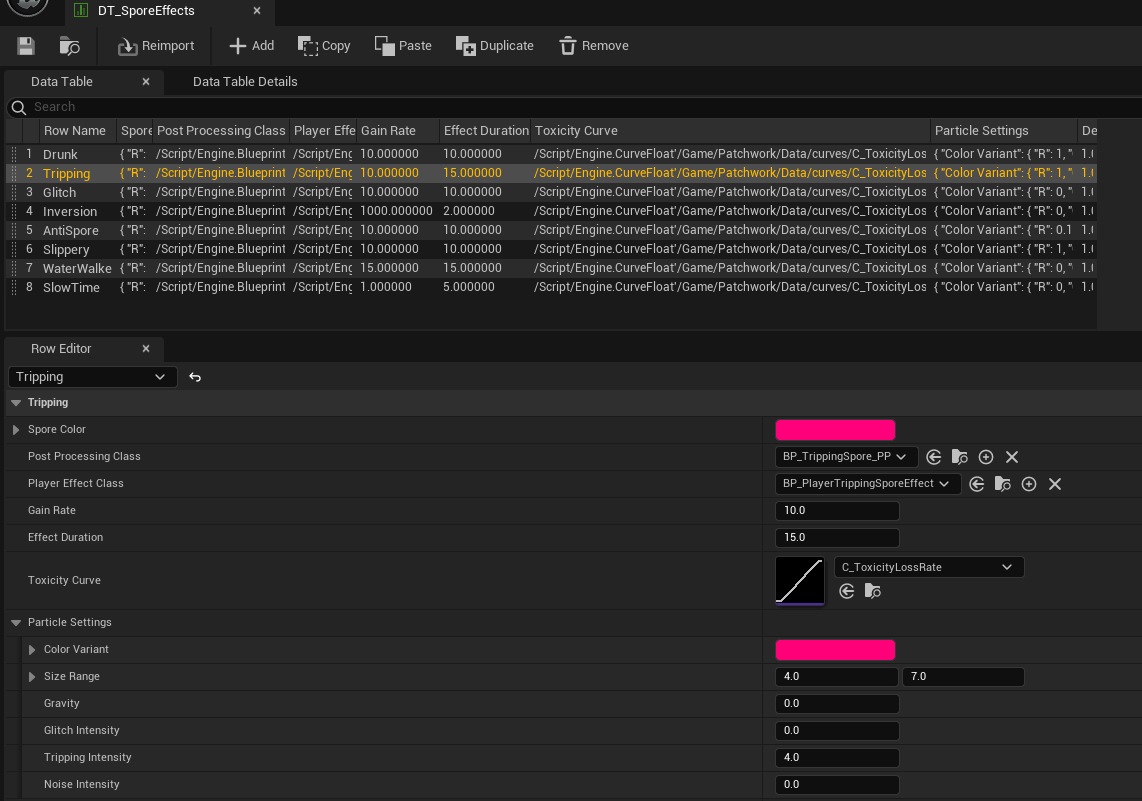
The spore effect system plays a central role in the game’s unique and surreal gameplay. The two driving forces in the effect system is the Spore_Effect_base and the Spore_Region. The effect’s current status is tracked as a float called toxicity on the spore effect base. The region class tracks overlapping actors and increases toxicity over time. The effect itself will decrease toxicity over time, provided it is not currently overlapping a spore region.
While it is a simple system, it can be expanded in limitless ways through new effect subclasses.
System Visuals
The other aspect of the spore system are the visual layers. There are two primary elements to the view layer:
- Visually distinguish the types of spores from each other
- Applying visual effects while the player has the effect active
The first part has the additional complexity of potentially being represented in different ways depending on the context.
Dialogue System plugin
I can’t take complete credit for the dialogue system in this game, the majority of the system is provided by this marketplace asset. However, I did have to do a fair amount of work to integrate it properly. I also implemented my own customizations to improve the system. The plugin was provided as a full game kit not a standalone plugin, so I needed to reverse engineer much of the project to extract the code I needed.
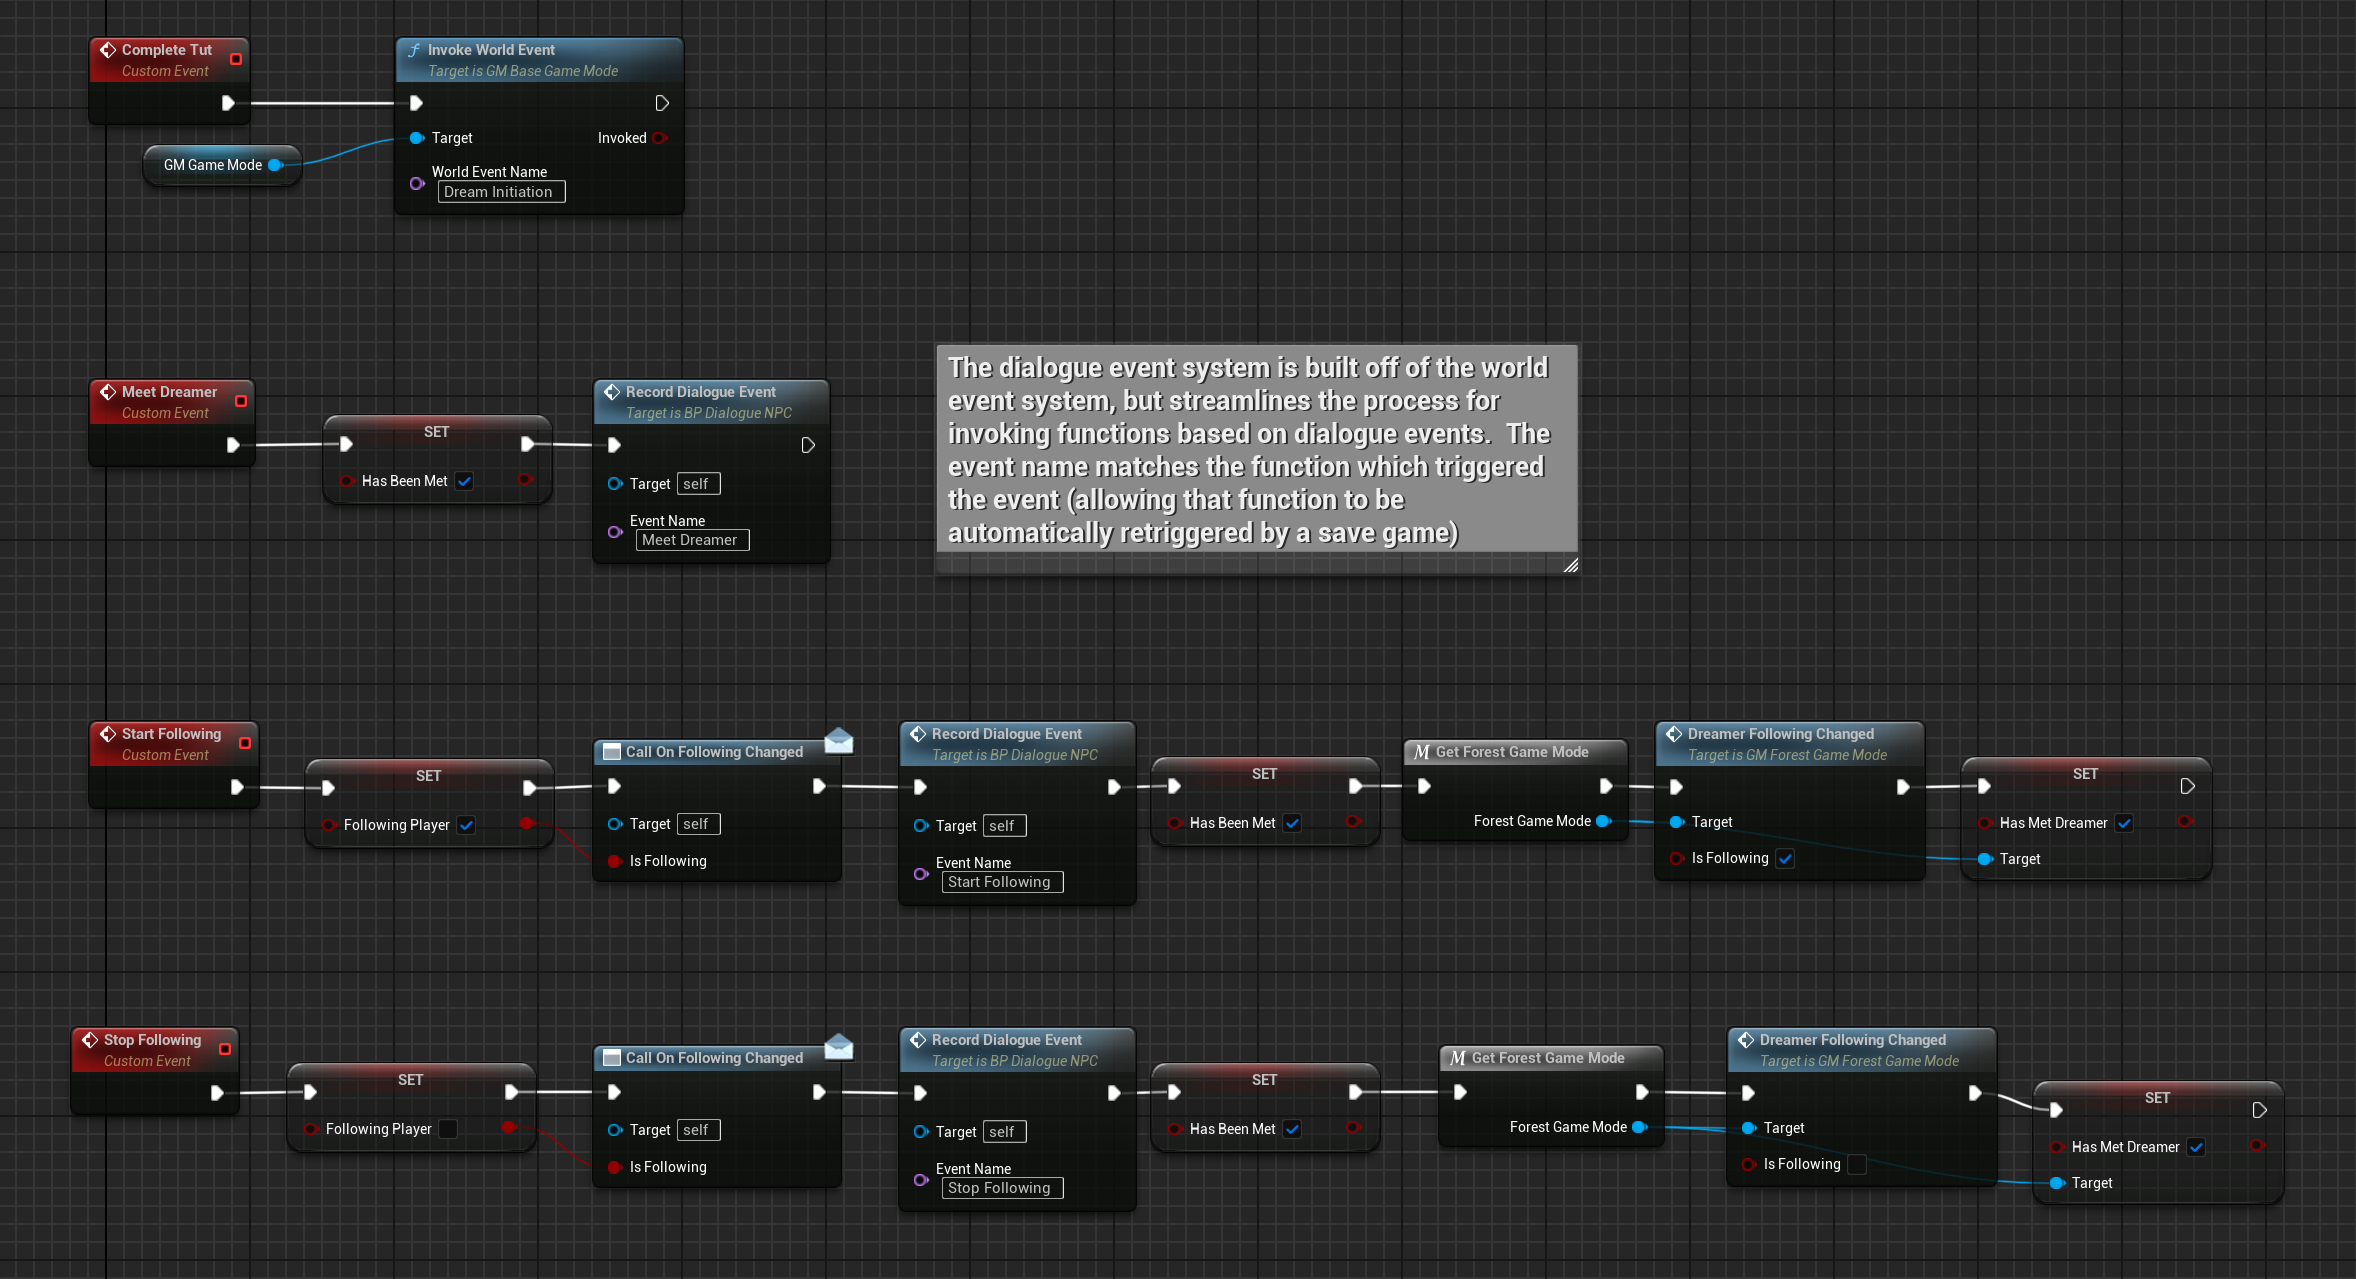
Customizing the plugin
The biggest customization I made was the way that dialogue called outside code. The plugin sent the event string into a global message bus, and listeners would have to filter out for the string that they cared about. While this was good enough for some situations, I noticed that the behaviors called from inside dialogue usually pertained to the NPC speaking in the dialogue. So I added the ability to call functions/events that are defined on the speaker class, if the NPC class has a valid function name that function will be called as well. This uses a method of actor reflection as well, so it remains fully decoupled.
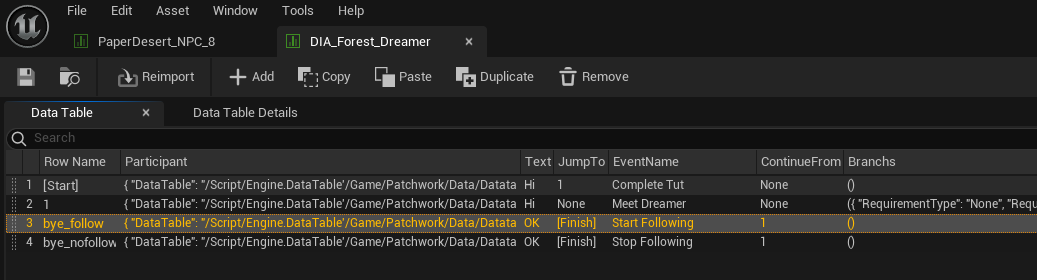
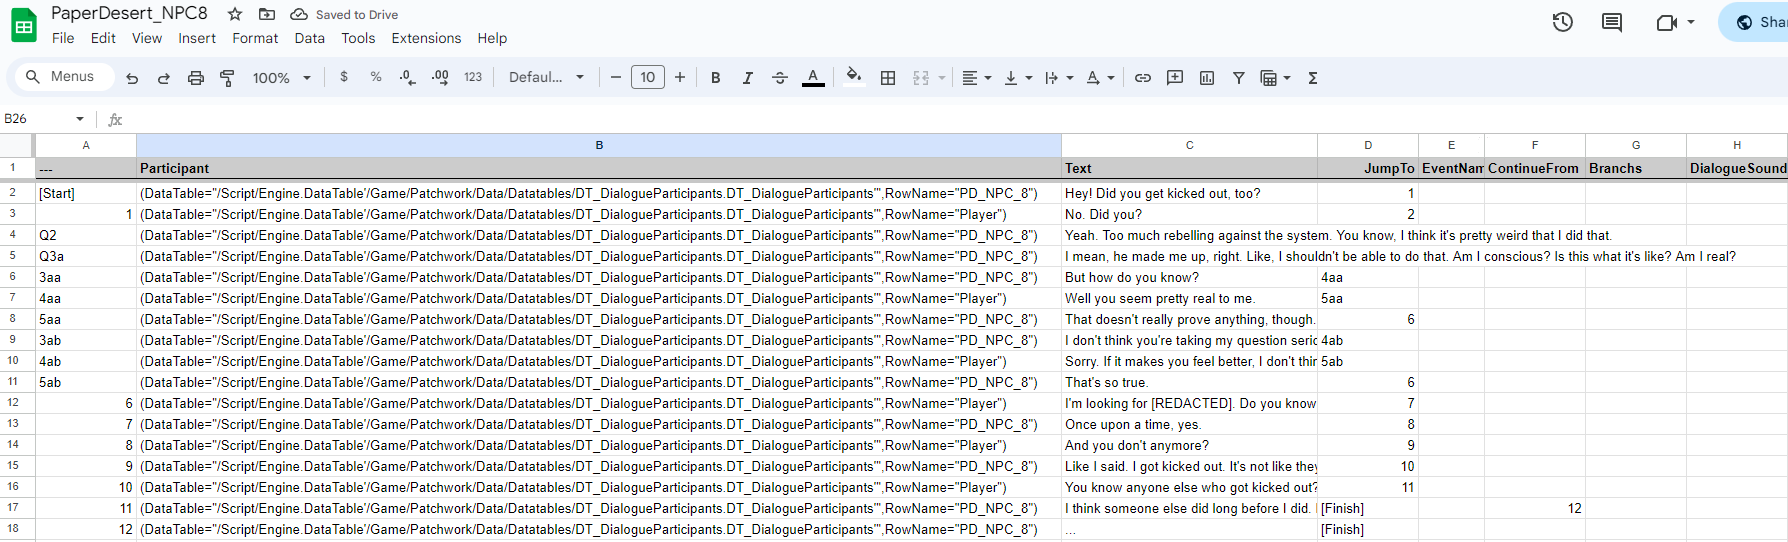
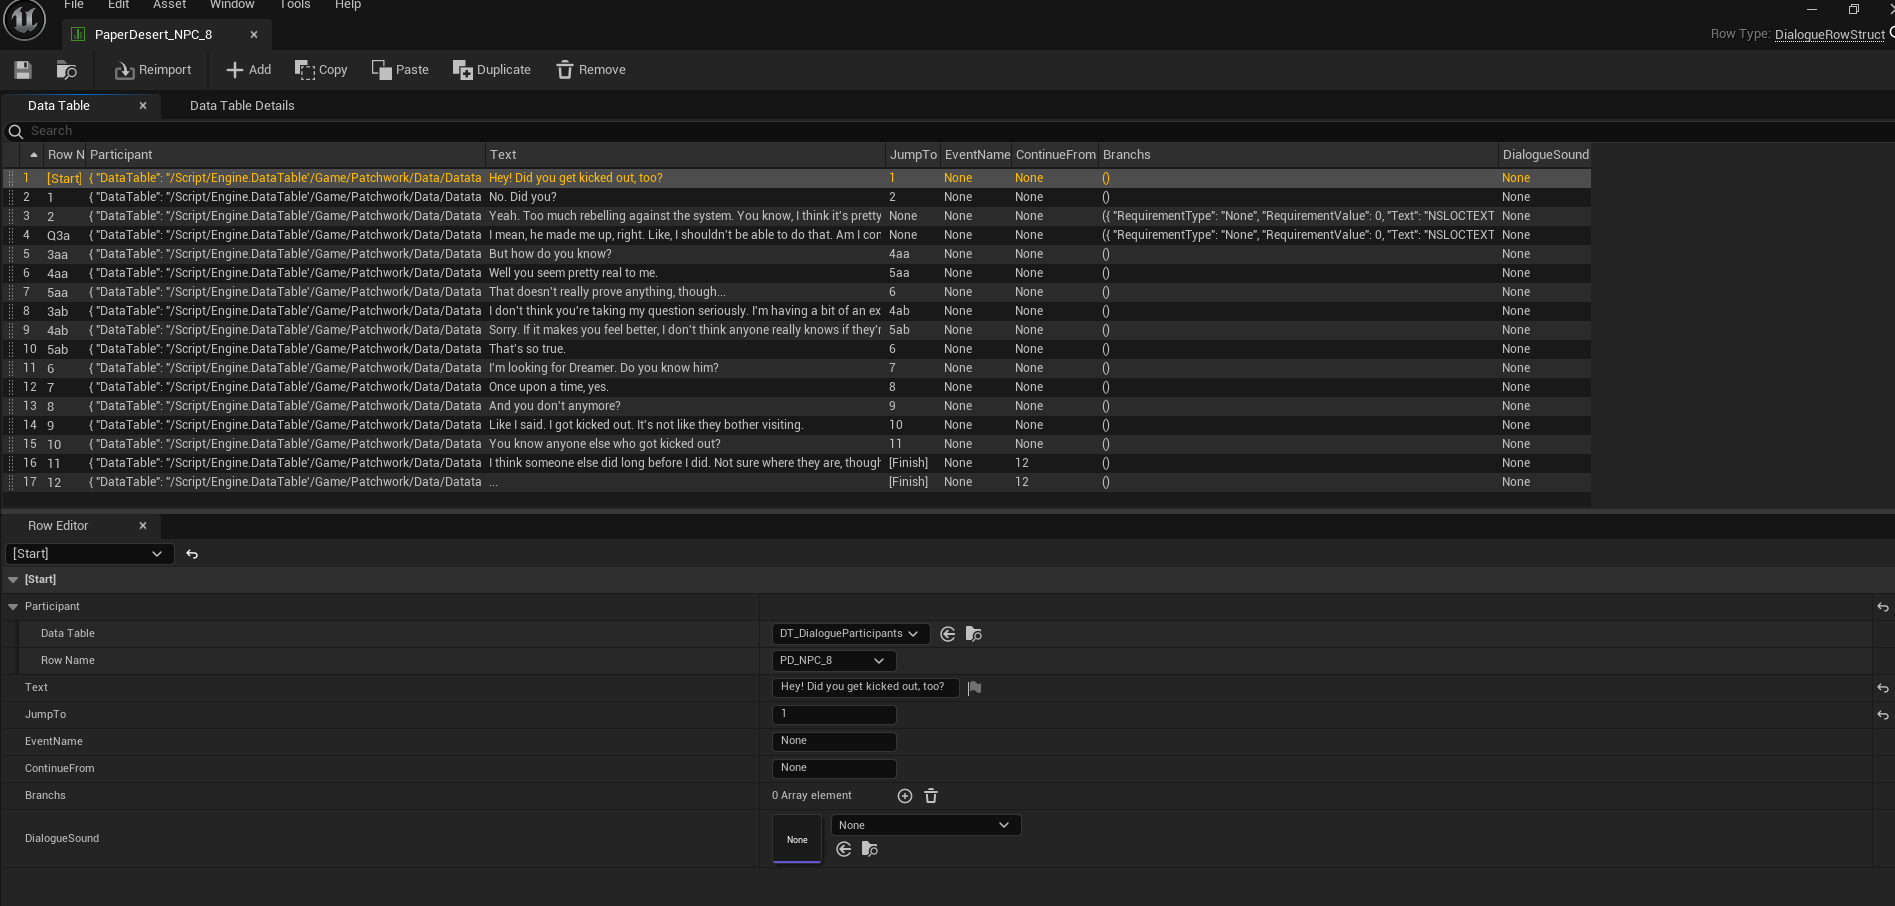
Writing Pipeline: Easy Authoring for Writers
Once I felt I had a fairly comprehensive understanding of the plugin, I then needed to establish a pipeline for the writers to put their writing into the game. I acomplished this by creating a Google Sheet that I could then download as a .csv file and import into Unreal.
Menu System, Settings Menu, and Common UI Plugin
The dialogue tool I added depended on the Common UI plugin. Upon investigation, I decided that I should reimplement all the game’s UIs to use this tool.
Settings Menu
All the of game’s settings are stored in a save file, separate from the gameplay save file. Settings are loaded immediately, and are globaly acessible by any class through the Game Instance. Each category of the settings menu is a widget that inherits from a base class. Using a dirty flag, the root menu class tracks whether or not settings have been altered. This allows the root settings menu class to prompt the player to either keep or discard their changes when they leave the menu. This feature is very important because players on lower end machines could set their settings too high, causing their frame rate to drop to near zero. If this happens, it becomes near impossible to navigate the menu and revert the settings. The prompt and the countdown timer solve this issue because it will automatically revert to the previous settings if the player fails to apply their changes.
Reflection
The one aspect of the project I would change if I could do it over would have been the choice to use only blueprints. I choose not to use C++ initially to make it easier for the other members to use the project, and not require them to download visual studio in addition to unreal. The second was that I did not anticipate the project extending beyond the duration of the Game Jam, so I thought blueprints would be sufficient.